Can organization fuel motivation?

Continuing Mom’s topic of journaling a bit now… I listened to a podcast recently, co-hosted by one of my favorite people/authors Laura Vanderkam, and the topic was planners. Like paper planners- apparently a world unto itself, types and styles, and decor and stickers, the works. One thing I learned about was something called “bullet journaling” – a flavor of journaling/planning/etc I’d never heard of, but struck me because its premise seemed to fit my tendency for lots and lots of lists, as well as big dreams and getting stuff out of my head on paper now and then, combined with the need for basic scheduling and organization to handle my job as well as life stuff. Basically it’s a freeform way of making a planner (as compared to buying a prefab planner), creating different layouts to organize different aspects of life/lists/calendar/habit-tracking- the opportunities are endless, incorporating a journaling aspect by documenting every part of your life you wish, and in a creative (tho not quite an art journal) way. This article explains it nicely (tho pardon the crass language)!

Now the “bullet journaling” is one thing- but it made me ask the question of whether my difficulty with following a crazy dream or finishing a big project may actually be a lack of big picture organization. When I don’t finish big projects, was it a lack of motivation or failure of organization? I tend to start something big and not finish, or when I do finally finish it felt like pulling teeth just to restart again (er, a kitchen remodel?). Or I get a big idea I’m excited about but then never really do anything about it and the excitement fades. Does the excitement fade because I’m just not feeding the idea or was I not really that into it?

How To Develop Goals In A Usability Test

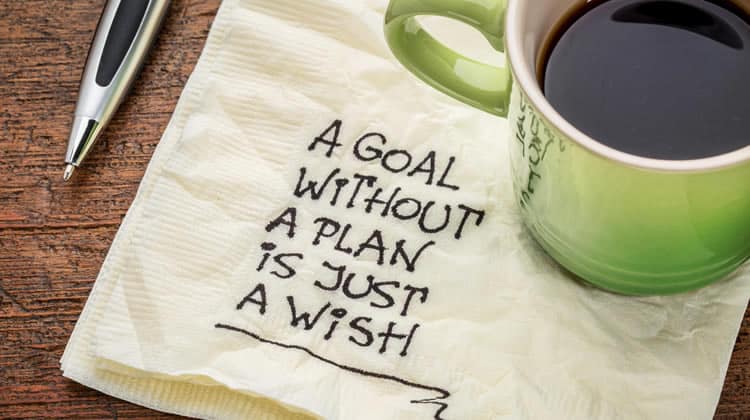
On the podcast, co-host Sarah discussed things like weekly, monthly, quarterly, annual goal-setting and regular review of objectives and action items (!!). Like a whole other level of ‘getting stuff done’ that raises the bar from surviving the rat-race to truly thriving in life and accomplishing a bunch of stuff it seemed. (Do you remember when life could operate just off the little freebie calendar from the Hallmark store in moms’ purses– purses which entirely lacked smartphones?)

Image result for hallmark date book
But there’s also a personality type thing there- like the type of person who likes to write down and carefully organize and review all these life things (from dentist appointments to grand personal change or adventures) is also perhaps the type of person who will complete something just for the sake of checking the box and the sense of accomplishment that alone brings. So they are already the sort of person who seems to maintain the necessary motivation to get stuff done. I’m sort of the type that get a kick from checking the item off the list. But not completely. *See interesting Four Tendencies quiz by Gretchen Rubin.* I don’t qualify as an Upholder according to Rubin, so the box-ticking satisfaction only gets me so far. But still, perhaps this life map documentation style that puts ‘reframe your whole life’ stuff right alongside the ‘get groceries’ stuff each day really could drive forward those big picture goals and dreams- keeping them better fed. I’ve spent the last year or so getting pretty dedicated to a paperless approach, founded on my Outlook calendar and Evernote for list-keeping, both which sync from computer to phone and vice versa, but I’m tempted to try some kind of planner/journal approach now. As luck would have it- or serendipity- I pulled out a perfect little thin-paged notebook with my name embossed on the front that one of my BFFs gave me years ago and I just hadn’t found a purpose for this perfect little notebook yet (though it did escape my Konmari purges so I trusted it would find its purpose one day).

jpic

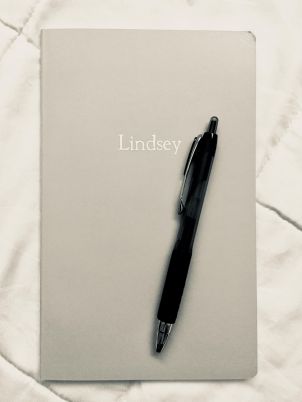
So, I’m experimenting with this journal-planner concept a bit. I wonder if I could do a better job of documenting kid milestones too with this approach? And perhaps the paper-based creative approach would allow for the simply therapeutic aspect of documenting life (e.g., traditional journaling)… though honestly blog writing provides that too, much of my motivation to get back to writing posts! Would love to hear in the comments how others handle organizing/planning/documenting of life – paper, electronic, combo? Does Hallmark still pass out date books?


Art Journal Morning

I thought it would be fun to show how I do some of my art journaling. Its a place to experiment and have fun. I will show the progress from start to finish. Any page I do is finished until I decide to add something to it. But  I usually move on to the next page. There are no mistakes in art journals. It is a practice of color use and mark making. I follow many artists and get new ideas. I have learned to use so many products, stencils, paints, paint pens and gel medium. I highly recommend starting an art journal. It will get you going if you need a boost to paint again. You can find art journals at Michaels, Hobby Lobby, WalMart, Amazon. You can make your own. I will have a lot of visuals today. So lets get started.

This is how I began. First I gesso the pages so they hold the paint well. Then I add some favorite colors of bottled acrylics to wash on the page. Just a nice washy mix. DSC_0003

Next I add stenciled areas with another pretty blue. This is where you start making marks and adding interest.

DSC_0004

I’m definitely thinking spring. Can you tell. Below is a shot of some of my favorite stencils.

DSC_0010

Next more marks with paint pens and stencils and stamps. I just use my regular acrylic brushes on the stencils. Messy works just fine in an art journal.

DSC_0014

DSC_0017

More stencils and washes of yellow. I have softened some areas of the painting with a light wash of white.

DSC_0018

Some new shapes.

DSC_0018

More flower- like shapes.

DSC_0021

This next shot is how I save paint. I just took colors that I had left over on my pallet and used a pallet knife to smear on the next two pages. They will be the jump start to my next journal page. Love the colors.

DSC_0024

DSC_0025

Now this feels finished before I start the negative painting. All my shapes and marks will look much different once I define them by painting around what I want to grow in this garden.  I used a very pale blue white.

DSC_0026


DSC_0029

Finished. I keep a special note on my design wall that I use in my head all the time.

“No Risk

No Art

No Art

No Reward”

I’ll be back with more art and quilting techniques. As far as the George house, Rog is on the hunt for a jet ski again. He couldn’t sleep thinking about it. Its noon and I’m still in my pajamas. I love my life.


Mom In The Delivery Room

Hey everyone it has been too long since I have posted on our blog, but I’m back and plan to get at it once again. Its been a few busy years with the birth of our granddaughter and  and my mom or better known as great grandma. We lost Pat, my stepdad 2 years ago in February and mom has moved to assisted living. So we have sold her house, had an estate sale and moved her into her new digs all in a 10 day span. Whew was that work.

Now to baby Greta. Lindsey shared her birthing story and thought maybe I would have a few words to add. All I can say that there is nothing as beautiful as watching your grandchildren come into this world. It is hard to watch your daughter at times especially in that transition and pushing stage. She let out a couple of primal screams that about sent me to an anxious state, but her Douala got her under control and all went well. As a nurse I can take all that comes to a patient, but when its your daughter it can get worrisome.

I do thank her for giving me that special time. It was amazing.

DSC_0058

I always heard there is nothing like grandchildren and boy is that the truth. Well I promise to get back to my blogging. I have lots of new things I am working on. I still create almost on a daily basis. Its my passion and I get so much joy in my studio. But the greatest joy is the grand kids. I know Roger agrees. He is still refereeing volleyball and loves it. He is a volunteer Citizen On Patrol with our local Sheriffs department and really enjoys that  too.  More later. Gee it felt good to get a post out again.

How I had a natural birth, the second time around: Greta’s birth story

I have now been meaning to write this story for 9 month! Better late than never. When preparing for delivering each of our babies, I really enjoyed reading and listening to people’s birth stories. It’s like this major event that no one really talks about in detail in normal life, women are just pregnant and then next you see the pictures of tired parents with squishy little newborns. But what happens in between? I liked the idea of a natural birth (what I mean by that is no pain meds/epidural) and aimed for that with O, by making a nice little birth plan I showed to my doctor, reading a Bradley book and practicing through fake contractions with Chad. But boy were we unprepared that first time around, and ultimately I had an induction, followed by epidural, overnight labor, and plenty of unpleasant physical recovery afterward. So, this time around with baby #2, I still liked the idea of natural birth but had that previous experience of getting an epidural, so I doubted by ability to ‘gut it out’ when I knew differently from prior experience. Over the course of this pregnancy, though, I came to two key points to help me decide on my birth plan: 1- stop asking ‘why do I want a natural birth?’ and try to justify it to myself or others, and start asking ‘Why not?’ … and 2- focus on goals for a better postpartum experience instead of the birth itself, as a numb birth led to some painful aftermath from bad tearing that I wanted to avoid experiencing again. So, we hired an amazing doula (birth coach) who could take over the hard work (well, I had the hard work I guess, but she did the heavy lifting when it came to guiding me through it) and let Chad just be Dad, and help give us confidence and negotiate decisions. I read somewhere that if a doula were a medication, every insurance plan would cover it in full for every birth. It’s that beneficial. We met with her twice beforehand to talk about goals, get tips, etc. I also was under the care of midwives for this birth, instead of an obstetrician, so that totally changed the vibe of pregnancy care and turned out to dramatically change things in terms of delivery philosophies as well. Highly recommend a midwife practice for a healthy, low-risk pregnant woman!

 So, today’s focus, the delivery itself– since I was registered with our hospital’s on-site natural birth center (a no-intervention birth suite attached to the hospital), they completed a thorough review of my history (they will only accept the lowest risk deliveries) and required me to have my ultrasound at 39 instead of 40 weeks, since I had very low amniotic fluid with my previous pregnancy by 40 weeks. This ultrasound at 39 weeks revealed quite low fluid as well, so there we were getting advised on immediate induction… again. No! I was so afraid of having pitocin again and thought it was going to derail everything. I was more relaxed this time, though, knowing birth plans need plan A, B, and C. I was sad I would be admitted to the hospital and no longer allowed to go to the birth center- since inductions is not something done there. I was really counting on relaxing in their giant tub!! But atleast the day had come and we had a few hours to get O taken care of at our friends’ house and pick up our stuff before heading to the hospital. I also sent out my pre-drafted email to some girlfriends notifying them and asking for prayers for a “safe and gentle” birth, which had become my mantra. And then, yet again, I walked into the hospital and signed papers completely not in labor, just like the first time. No laboring at home, no birth center. But atleast this time I had my bag of goods and my doula on the way. I’d also been having sooo many contractions in the last month or so that I thought surely I can just take a whiff of the pitocin and this baby will be out! But a few hours later (we started around 2 pm), hanging out with the drip, nothing. “Is it getting painful yet?” they kept asking me. Umm, no, I’m sorry I’m not in pain fast enough for you? So by about 8pm, my midwife asked me what time I usually go to bed and tells me if my body isn’t going into active labor by then, we can stop, get a good night’s sleep, a good breakfast in the morning, take a shower, and start fresh in the morning. This was a shocking offer I will tell you. I didn’t know that was even an option!  And I think I can say pretty confidently it wouldn’t have been with a physician. But midwifery is a different philosophy. Her angle was to have me in the best possible shape for delivery and postpartum, and since I would be in the hospital on a fetal monitor, the baby would be safe. If anything changed, we could change course since she would stay in the night in the hospital call room, but this option is the one we went with. Our doula went home after an uneventful evening, but I was so glad she was there for the moral support (and bonus foot massage!) given my fear of the induction. And with my fear greatly reduced after nothing really kicking in after 4-5 hours, I took a Benadryl to sleep (prescribed by midwife no less), ate a good breakfast, and had a refreshing shower as directed! Even my hair looked pretty good for this labor starting out.
Pitocin started again around 9:30 the next morning, I started feeling it in my back around 10:15, and then asked our doula to aim for arriving around noon. After how the evening before went, I was ready for a long slow process so was much more relaxed about requesting her to come in. By 11:15 I felt like I was needing to really focus, stop talking etc, through the contractions.
(pic below from 12:11 pm, in labor)
 labor1211pm

By noon our doula texted she was stuck behind a car accident, so got there closer to 12:30. That’s where the text message string on my phone stopped 🙂  But between starting to focus through contractions and our doula’s arrival, I got checked and was at 6cm (yay!), soon after my water broke (that’s an interesting thing, just leaking out dripping around everywhere), so I was in a great place when she got there. My parents had gone to get lunch in the hospital cafe, but Chad just grabbed his sandwich to go and returned quickly so I wasn’t alone before our doula got there. He ended up walking back in with her. Very soon after, a few ‘stop me in my tracks’ contractions, and I didn’t want to sit on the birth ball anymore, it sounded good to try laboring in the tub or try something different. So that was getting filled up while they helped me get situated leaning forward on the end of the bed for a bit. (I learned after that my doula whispered to Chad at this point that I would not be actually making it to that tub). That’s when the next contraction hit, probably around 12:45 or 1, that literally must have been the baby dropping right into place and it was game ON. This is when natural labor got primal. Sounds I didn’t know my body could make. An internalization of my attention/focus that is hard to describe. A team of people was suddenly in the room, Chad was heaving me up onto the bed as my knees were buckling (sorry about that, honey). Somewhere in there my parents wandered back to our room from the cafeteria and got a shock I believe (Mom can chime in on exactly how their arrival fit into the time series). And onto delivery we were! Our doula spoke right into my ear words of magic and regularly applied her elixir of essential oils and about 30 minutes later lying on my side and one contraction at a time, little Greta inched her way out, born around 1:30pm. All 8lbs 4oz with her arm up against her face superman style (very helpful position, sheesh). When she finally came out and was up on my body I gushed with tears, just overwhelmed by the intensity- emotionally, physically, psychologically- of the whole event. We did it! I did it! She was here! Although I still didn’t know she was a she at that moment. Chad got to check and announce boy or girl, so we soon had the big news 🙂  We snuggled and nursed a bit and then while they did all the newborn checks and immediate care items, I got my clothing switched from my maternity t-shirt dress- that had gotten a bit, uh, messed- to a hospital gown for transferring to the postpartum room, and we started getting organized to head out of the labor suite after a couple hours to chill and bond. Oh, and somewhere in there I delivered a placenta and they checked me out, reporting ZERO  tearing. Mission accomplished. I officially felt like a superhero and was in love with my midwife and doula. I don’t think this labor and delivery could have gone better. I am soooo thankful! If only Chad hadn’t rubbed my hair into a birds’ nest during the pushing stage… ah, can’t win ’em all!

(pic below from 5:30 pm on our way to postpartum wing)
greta arrived 530pm

One trick pony, or master of parenthood?

After a two year hiatus, I want to get back to the blog. Given my last post was regarding O’s 2nd birthday, what better to start back off than planning another birthday party? This kid is 4 years old in two days! In these last two years, he has, well, he’s gotten two years older. He’s a shrewd negotiator- “But mom … it’s only one… I’ll be careful… ” He’s also morphed into a night owl. Our baby who practically dove into his crib on cue each night now hangs out in his bed until 10pm, sometimes wandering out for various distractions/requests, sometimes just playing around “secretly.” He actually told us– “Dad, when you put me to bed sometimes, I get out of my bed.” Uh huh, we know. He also grew up a lot in this past year, becoming a big brother, and beginning official preschool in lieu of the home daycare program he was in for 3 years. He’s an adaptable kid and is thriving with each of these big changes, thankfully. I wanted to take him to dinner just the two of us one night, having focused so much on the new baby recently, and he cried that he didn’t want to leave his baby behind! He loves her that much. I hope it lasts, because the sibling love is so beautiful!
So, back to O’s party planning- this will be… drumroll… a farm party! Again! Granted, we will hold it at the Loudoun Heritage Farm Museum instead of Frying Pan Farm Park where we did his 2nd. But he loves the little museum, it’s simple, and why reinvent anything in a phase of life that is already challenging enough? Hence the title of this post. I booked the little party space, ordered a few party items to supplement the farm themed supplies I had leftover from last time at the same website as before, ordered a gift on Amazon, sent an Evite to the usual kid-family friends and, voila, party planning complete. The food will include the usual array of single serving fun snacks (goldfish, fruit snacks we picked up last shopping trip at Aldi), sandwich platter, cake… and deviled eggs. Deviled eggs were recently decided to be our ‘thing’ to make for all functions. After reading a post about how minimalist moms conquer working motherhood, I decided doing what’s simple and works is best for us, even if it’s often the same. Because I’d rather be engaged and participatory, even if it’s in a predictable quick fire kind of way, than scattered and overwhelmed by coming up with something new constantly. What theme birthday party should we do this year? … leads to… Forget it, this is exhausting, who has the energy for planning kid parties? Who has the time to cook for social gatherings? We’ll just skip or arrive feeling guilty with the usual excuse “oh gosh, we have a new baby, couldn’t be bothered [hand on forehead in exasperated manner]!” No good. I’m just deciding many things don’t have to be that complicated. Yes, my kid has the same birthday cake plates and little decorations at his 4th birthday party as his 2nd birthday party. But, he didn’t have a party at all turning 3! 😦  I’ll pick the same plate pattern over skipping out altogether any day. Yes, we will now bring the same thing to every potluck, church event, work lunch, etc. But we always have eggs, the instant pot makes hard boiling a batch a cinch, O thinks it’s fun to take off the shells, and Chad has a particular egg filling mixture using honey mustard that he enjoys making, so this one is a no stress item for us and works for everything. Also, it’s chocolate-free, nut-free, and vegetarian so works for almost everyone (sorry, vegans). We can even make it Whole 30 compliant when necessary! For that matter, I’d rather write a quick imperfect blog post than put it off for two years in the name of perfect pictures and prose. So, invite us to your next shin dig and you can always count on us for the protein.  If you’re coming to our thing, you can bet you’re safe wearing jeans and a straw hat.

Budget Kitchen Remodel: Conserve, Conserve, then Splurge!

Finishing the concrete floor was a daunting task, but the major thing that motivated me to get it done was what was sitting in hallway waiting to be installed the whole time. Rewind… I decided my birthday present this year and also reward for saving bucks in other places in this kitchen- like, ahem, pushing through all that concrete skimming- was a total splurge purchase of a kick-butt, top of the line, make-my-life-easier-every-single-day-of-the-week, shiny new dishwasher. This actually sat in our hallway for weeks after delivery pushing me to dive into the darn floors so we could install it. Great motivator! The existing dishwasher was the only appliance that wasn’t new when we bought the house, but worked fine (except for the fact it was hooked up to reversed plumbing and only used cold water- um, not effective). So originally the saver in me was all about this budget kitchen face-lift getting done using the old dishwasher. But then I listened to an audio book during my commutes about how working moms really can ‘do it all’ and, specifically, the chapter entitled “Make Life Easier” and BAM, new awesome clean-dried-outmeal-off-all-your-dishes-and-out-the-baby’s-hair-at-the-same-time dishwasher was ordered! (maybe not the baby’s hair) Anyway- total splurge. But it was for my birthday, did I mention? And scraping, soaking, and clean rinsing every single dish in our little sink for the past 9 months to go into our tepid dishwasher sent me over the edge on pre-cleaning dishes. No more precious minutes spent on dishes! No. More.

Enter: Glorious new Bosch dishwasher [insert beautiful singing here].

dishwasher open

I went with the Bosch 800 series, with features like hidden flush buttons (O really likes pushing buttons so this was key), a third top rack for misc and sharp things out of toddler reach (O really likes ‘helping’ unload, including sharp knives if he can reach them so this is great), and eco-friendly settings like “half load” and “eco” so I can run it daily without feeling guilty. And it has an integrated handle with no frills/parts (instead of a bar or something) because I think ahead and know my sweet toddler will eventually swing and climb and hang on anything as tempting as that! And it’s practically silent. So now finally Oliver will listen to me because he probably just couldn’t hear me over the dishwasher all this time when I said “no/stop/wait/come”! (= fantasy parent epiphany). I did get this on sale and ordered online a slightly different model than the main one they usually stock which was another $50 less. So with free delivery, it was about $900. Big purchase for me! My big downfall of this semi/un-planned purchase was I ordered it right after Virginia’s tax-free weekend, when I could have saved another $50 on sales tax because it’s an energy efficient appliance. Frustrating. But you don’t get bent out of shape on things like that for splurge/birthday present/reward purchases, so I forgave myself. I was so excited to get this in, we worked until almost midnight and I still painstakingly poured in my sample of rinse aid so I could run the first load!

dishwasher joy

Some tips for installing a dishwasher yourself (besides first learning what you’re doing with electrical/plumbing stuff in general): definitely read the instructions through and inspect things before you plan to actually do it (I actually do this for eeeeeverything we do in advance), realize dishwashers sit flush with cabinet doors- not the cabinet boxes or the countertop, and though the instructions note checking the centered-ness of the dishwasher once it’s back in it’s hole, you really have to get this straight from the get-go and slowly slide it in inch by inch, making small adjustments all the way as you go. Once it’s in, there’s no way you’re going to be able to slide it side to side without pulling it out and starting over.

There are so many things I love in this new kitchen- the bigger sink, the amazing faucet, but this is my best kitchen bud. Since I’m behind on blogging, I’ve actually been using this about a month now. And with the eco setting, I just run it each night after dinner which is so convenient compared to waiting for it to be full and in between having to hand wash our daily smoothie blender pieces. And no more rinsing, just scrape off in trash and load. Which means more time for family. And isn’t that the point of all this home stuff anyway?

Taking A New Path

You know I am always quilting and knitting and whatever else. But I have found something new that makes my heart soar. I am having a ball. I was getting a bit board with quilting and decided to get my paints out. I had been perusing Pinterest and fell in love with Art Journaling. Now I always thought anything with the word ” journal” in it meant spilling your thoughts and woes on a page or just keeping track of your life. But art journaling is a way of keeping your art in a compact place. It’s mixed media.  It’s a place to try new things and possibly spark something bigger . Its fun and so relaxing. I usually make my coffee, and run to my studio to do a bit of painting before Rip VanWinkle gets up. Roger loves to sleep in. It works for me most mornings.

I started this path by soaking in as much info as possible. I bought a few books, new art supplies and watched UTube by all kinds of artists.How did we live without Utube?

So today I’m going to share my journal pages. My Owl page sparked a nursery quilt. So you see this doodling and new techniques can inspire something bigger than your journal page.

My Book

I bought this at Walmart. It has nice paper and easy to work with. I start with pasting two pages together  with gel medium matte for every piece of art I do.

DSC_0074

page 1

DSC_0057

page 2

DSC_0076

page 3

DSC_0075

page 4 and 5

DSC_0059DSC_0060

page 6

This is a great background for something in the future. Your paintings are never finished. You can always go back and add to them.

DSC_0065

page 7

This was inspired by a photo I took in the mountains a few years ago. This is agreat example of forcing me to do things differently. I always painted in realism. I wanted to paint whimsy. Now I have learned ways to venture out and try new things. This painting has also turned into a baby quilt wall hanging that you can see in my Etsy shop.

DSC_0066

page 8

I love bright colors, but here I want to paint soft and subtle. The harlequin pattern in the background was done with a palate knife and texture paste. So fun! ( I would love to do our bedroom in these colors) 🙂

DSC_0068

page 9 and 10

DSC_0070DSC_0071

page 11

At first I wasn’t happy with this, and I titled it Good and Bad days. Make art anyway.. But I kept adding more and more and I love it. I hope I have inspired you.

DSC_0073

Get out those brushes and blow the dust off of them. Your paints last practically forever. I will list a few of my favorite artists that inspired me. Start reading their blogs and you will learn so much.

Home

Balzer Designs: Tutorial: Start With a Strong Image

https://belindafireman.wordpress.com/

Budget Kitchen Remodel: An Experiment in Concrete

This post is about a month late, but work has progressed on the kitchen! And this stage was done by my deadline-ish of end of Sept to have most of the major work done. As work progressed on the walls, we still needed to decide what to do with the floor. This was an area where I wanted to save some $ because long term, I’d rather the entire upstairs-including the kitchen- be the same flooring, but that is a more expensive undertaking for down the road a ways. We needed a “for a few years” floor that wasn’t worth dropping much moolah into. But even lineoleum would cost $150-200 in materials, we didn’t want stick down tiles again- couldn’t WAIT to get rid of the grimey ones we had. At any rate, any cheap flooring would just look like… well, cheap flooring and would still cost a couple hundred bucks in the end. Call me crazy, but I kept coming back to skim coated concrete. People use it for countertops, and other Pinterest-y DIY projects and it seems like a cool, industrial, natural/non-plastic looking finish that was worth experimenting with. For example, this kitchen looks pretty cool I think: 

I had to convince Chad on this one, but he came around and I quickly bought the supplies before he could change his mind 🙂  (Kind of like I quickly starting painting cabinets to start this whole journey off before anything else could happen to delay!) The Feather Finish (Ardex/Henry) material is actually a polymer based concrete mixture, so this is NOT pouring exterior concrete in your house. It’s using a patching/repair compound to just coat your surface to give a concrete looking finish.

However, before any of that could start, step 1 was repairing the flooring under the weirdo floating cabinet between the kitchen and dining room, which miraculous was a simple task. The flooring just extended under the cab so we had to cut some away, as opposed to trying to patch it with leftover pieces. Chad got a new multi tool so this was actually pretty easy. Bummer we discovered some old wall damage that wasn’t repaired properly when someone put that weird cabinet there years ago. So more drywall work for me later, yippee 🙂

floor cutout

Next was moving everything out to the dining room (no oven until this was done!) and tearing up the vinyl sticky tiles. So our dining room/kitchen looked like this the week we were working on this. Eek.

dining room living

And STICKY was the name of the game removing the existing tiles. Modern day conveniences (ie, peel and stick flooring) = disgusting messes for whoever gets ‘stuck’ with it down the road (pun intended). We used the multitool Chad got for cutting the floor to work up the edges and this floor scraping pole we found (!) in our garage from the previous. It had mud on it like they used it for edging the lawn or something. Lucky find for us! And scrape, scrape, scrape we did, for two layers of sticky tile for a few hours. Here’s what this process looked like…

floor removal

The next conundrum was how the heck to work on the floor when it was too stick to actually step on. Solution- sprinkle and scrape out the concrete mix we would be using to soak up the stickiness a bit. From there we sacrificed a $3 tarp from Harbor Fright to cut up and lay out on the semi-sticky powdered surface to work around the room. The tarps were key! But cardboard or anything else you’re willing to pitch later would work fine. And you could do this same technique to prep any sticky subfloor by sprinkling another kind of powder (corn starch?) or sand down to help you move around and even try to scrape up the adhesive if you need to.

floor powder

Next we started mixing our skim coat according to package directions in small double batches. You have to work in small amounts because it sets up in minutes. The first coats I scraped on very thin with a metal trowel, scooting around with my sticky tarp.

floor first coat

When it was dry after about half an hour, so you could walk on it again and we did these layers late at night after dinner so it wasn’t as inconvenient as it looks. It was also much easier after the first coat covered all the sticky gunk. Chad handled the mixing station and I scraped on the layers each night. This stuff sets up fast so I had to keep scraping my trowel clean so the drying bits didn’t crumble into my next batch.

mixing station
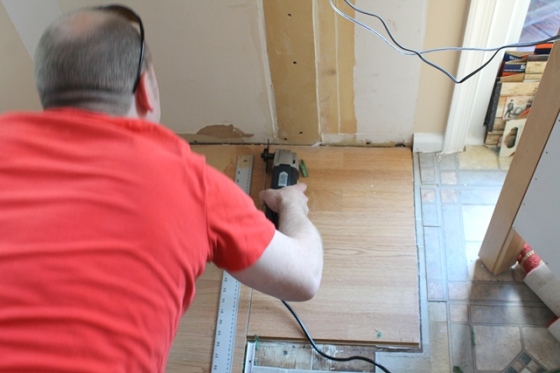
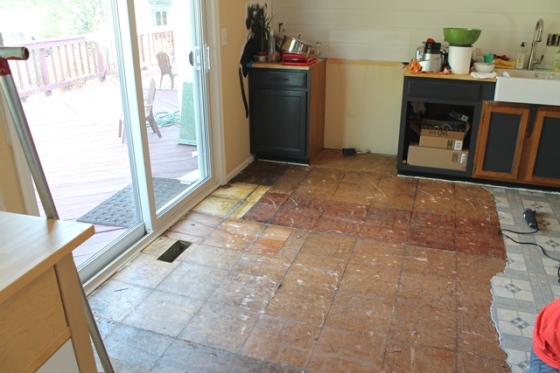
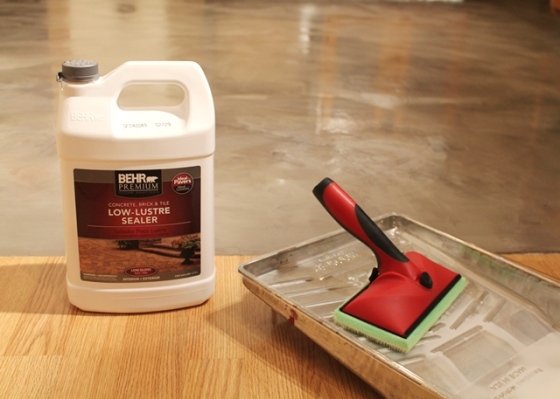
After the first two very thin layers, thick spots of the tacky dirty gunk still showed through slightly, mostly where the vinyl tile seams were so you could still see the square shapes in certain areas.

floor 2 coats

So, fearing we’d be doing a dozen layers with  this technique, we decided to smooth it on a little thicker for the third coat instead of the scraped thin coats, assuming we’d sand it all smooth in the end which gave us this.

finished concrete

Next I kind of stopped to think. I hated the idea of fine concrete polymer dust spread everywhere using an electric sander and hand sanding was practically pointless on this once it hardened up. So after a couple days, I scraped down the ridges and little bumps here and there with a putty knife and I really loved all the depth and texture it had. Kind of like slate has a lot of natural imperfections. So we decided to just seal it and live with it and see how we liked it. Much simpler proposition! So out when the sanding plan, and on went the concrete sealer to this third and final coat. The sealer was a breeze!

floor sealing appl
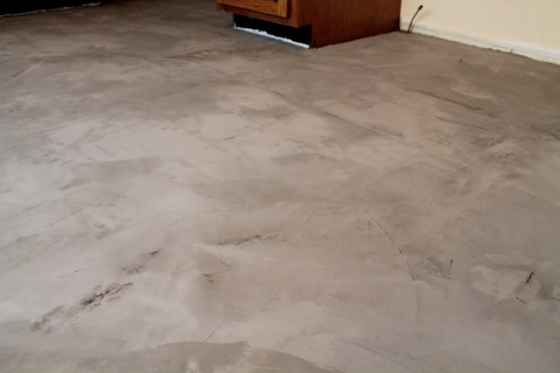
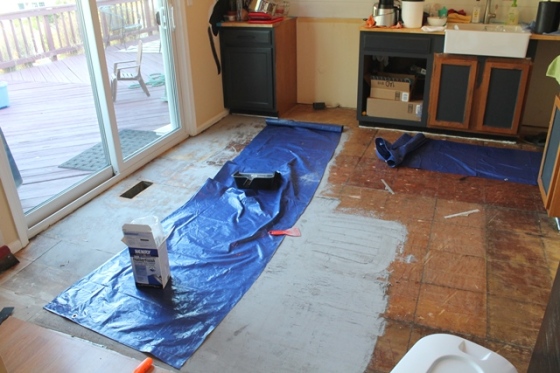
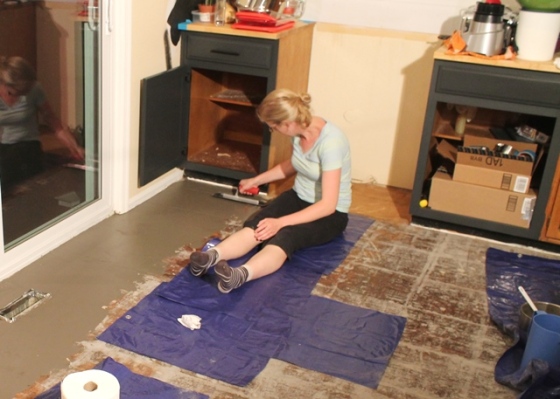
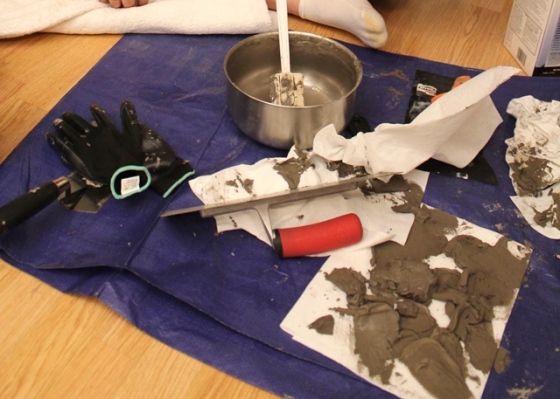
I did a coat one night, again the next morning, the next night, and a fourth coat the third morning. So it was four coats of
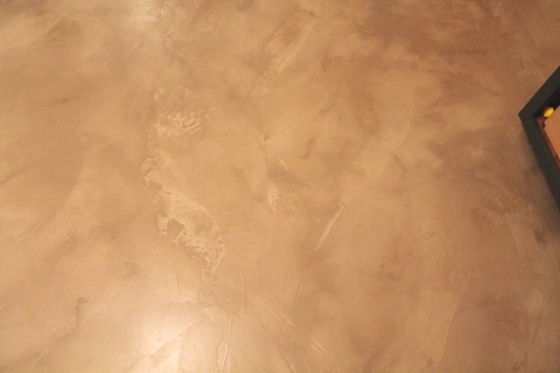
 Behr low luster concrete sealer, each about 12 hours apart to avoid having to scuff in between. You can see here the variations in the overall final look.

floor finish

Sealing really put the final touch on and left us with a reasonably durable, polished looking industrial floor. floor sealer

There are certainly imperfections so if that’s not your thing, this might not be the project for you. But for $100 in feather finish and sealer, we have a new one-of-a-kind floor with a lot of personality. We’ve dropped things on it since finishing it in Sept and it seems like a sharp object (dropping a fork, tines down) might chip or dent the surface a bit, but it’s not noticeable in this type of rugged floor finish and it’s nothing that recoating the sealer once a year or so wouldn’t fix. The beauty of it too is that when we do change all the upstairs flooring, we have a nice subfloor all ready to go too 😉 K, now on to upper cabinets!

List update:

Redo backwards plumbing to sink and dishwasher (currently reversed and feeds only cold water to dishwasher!)

Remove floating cabinet, repair dining room floor

Remove upper cabinets

Remove backsplash tile

Replace countertops

Install new sink and faucet

Replace hood with over the range microwave (Done- coming soon!)

Added: Finish painting cabinetry, install upper cabs

Sell current hood and microwave (added: and dishwasher) on CL (bonus! sold extra washing machine to couple at HD! +$180)

Install backboard to backsplash wall to ceiling

Install open shelving

Install backboard on island, bar attachment?

New ceiling light

Install undercabinet light

Paint inside pantry, new door knob

Install hutch to dining wall, paint, move light switch

Paint remaining kitchen walls (working on it!)

Replace flooring

Added: Install new quarter round, floor transitions

Less Is More

DSC_0003Every year about this time we contemplate getting rid of the pond that we have loved so much. But any time something breaks or its fall, and time to cover it with mesh, we discuss it’s demise. When you are retired, you want less and less maintenance. So we began to peruse Pinterest and found a few pondless waterfalls that we liked. We called Lonnie, our pond guy and he came and drained the pond and took all our fish so they can enjoy some other pond.  We were left with a stinky, mucky hole and Rog took over from there.

DSC_0017

DSC_0020

He moved all the rocks out of the way to get the liners up and clean everything with a pressure washer.

So much work, but he wanted to do this by himself…so I bowed out. Notice he wears ear muffs the whole time, listening to music so he can’t hear me.

DSC_0018

There were plants and shrubs to move, electrical wires and water lines to move and most of all the pump. Whew !

He had dirt dropped twice. But I must say , he did such a beautiful job and we love it!

DSC_0001

DSC_0006

Now we still enjoy the waterfall, the sound of it and all the birds enjoying their daily baths. No maintenance to speak of. Rog is pretty proud of his project and I am amazed at how beautiful it all turned out. Way to go honey. It’s wonderful! He also lit the Japanese maple and the waterfall with new covered out door receptacles. He is even talking Christmas lights.

Oh Clark 🙂

Night pics later.

And here they are….Wow, I finally got a post off.

 DSC_0004 DSC_0005